BAAAHS Light Programming Introduction
We’re less than 4 weeks out to gate open at Burning Man and tons of folks in the BAAAHS community have asked how they can write shows for the sheep. This will be a whirlwind walk through of the lights infrastructure and software architecture.
First off, I highly recommend reading overview I gave last of year of how the hardware is setup and how everything fits together. This is inteded to be a fairly technical, hands on walk through, and does require some basic knowledge of programming. Despite the technical degree of things, the “dev environment” does not require you have much installed except for the following components:
Installation
Two pieces of software are required:
- Docker (or another link if you’re on Windows, or using system package management in Linux) – is a container engine for your machine that lets you run visual image slices (thing Virtualbox, Parallels, VMWare, etc…)
- Processing – follow the instructions here – is a visual arts-ish programming tool. It’s very similar to Java, so if you know Java you’ll be right at home.
Code Acquisition
Once you’ve got Docker and Processing installed, clone the Sheep Simulator repo:
git clone git@github.com:baaahs/sheep-simulator.git
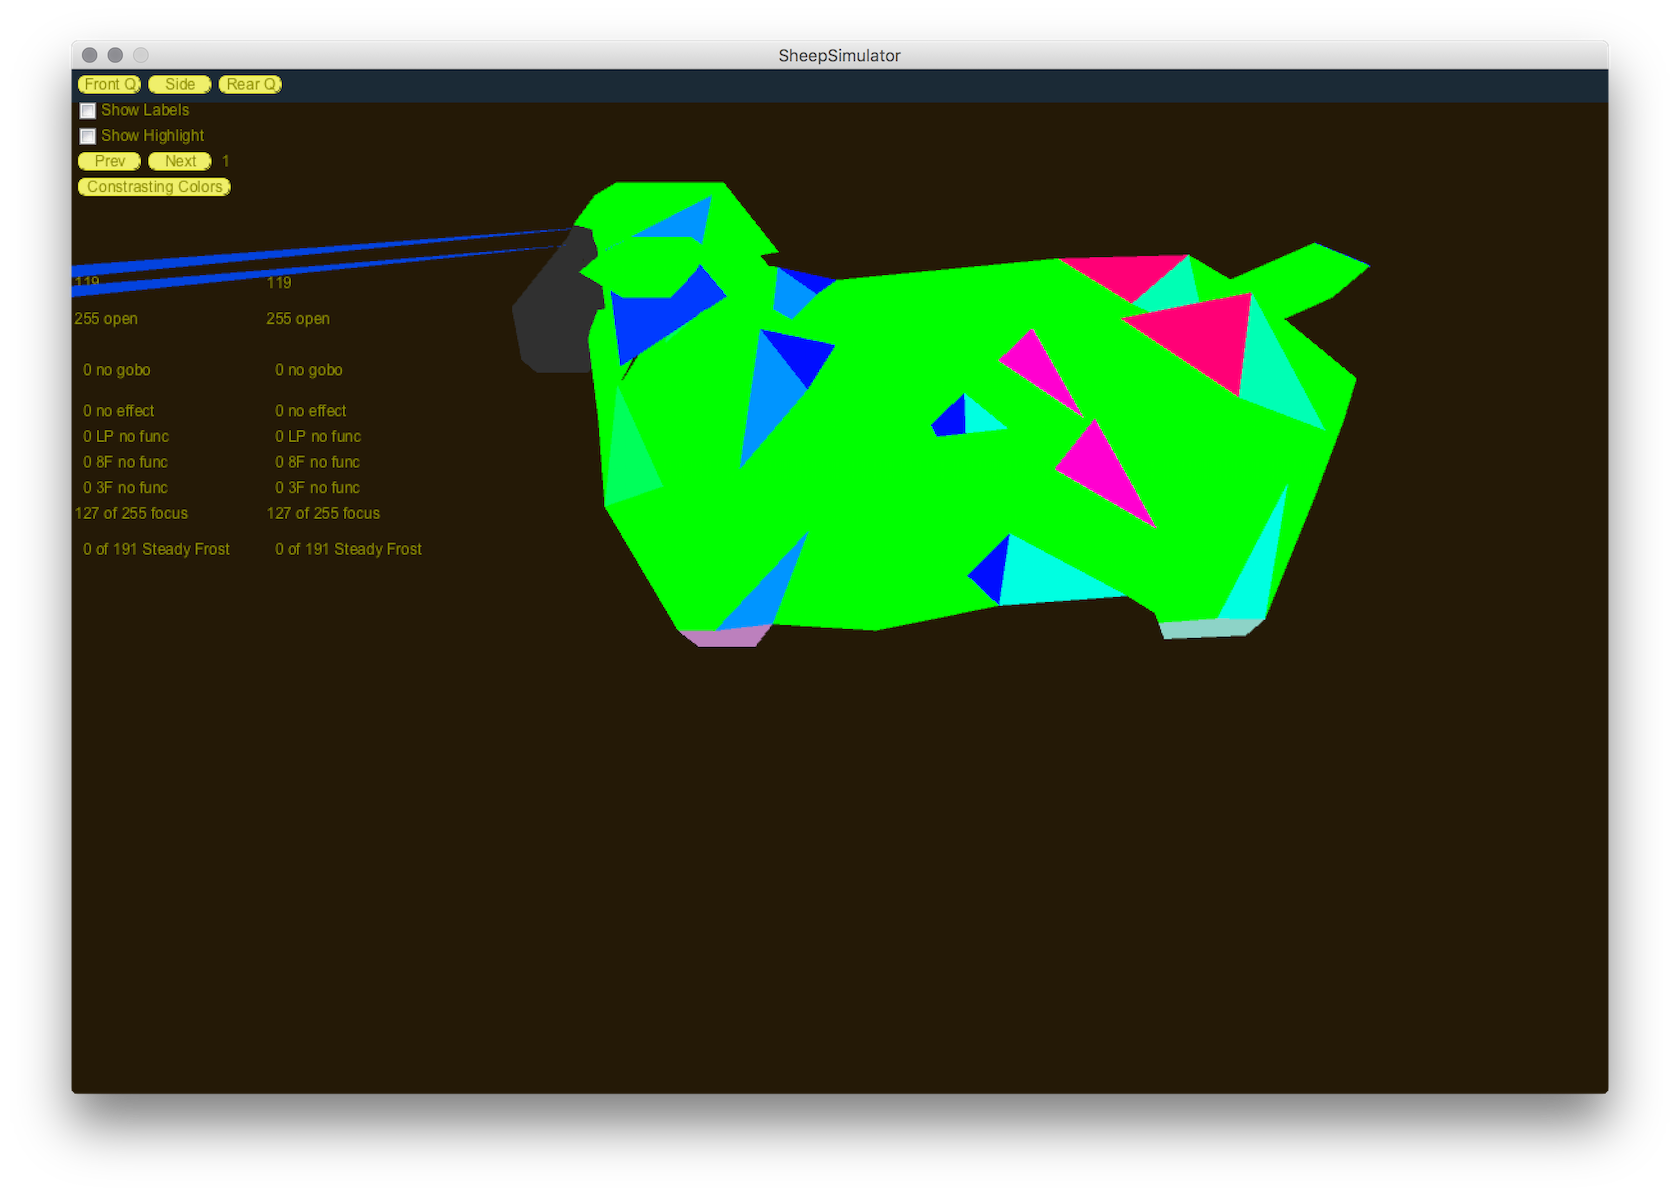
Onced, cloned, open the SheepSimulator.pde file in the project. You should see a panel with two tabs:
SheepSimulatorCamera.java
Select the “play” button. If you’ve run through all the steps successfully for the simulator, you’ll experience the creation of a new window containing a multi-colored sheep. This is what we want. Way to go!
Run the server
The server connects to the simulator in place of the OLA daemon (the control daemon that exists on the actual server that translates software commands to DMX frames, signals that control the lights). Because the simulator connects to the server the simulator must be running prior to the following steps:
To run the server (with Docker installed), execute:
docker -d run --publish 9990:9990 --publish 5700:5700/udp --publish 9000:9000/udp baaahs/light-server:latest
What does ^^^ command do, you ask? Well, it does the following:
- instructs the docker engine to run the image “baaahs/light-server” with the tag “latest”. This data exists in a central repo, Docker Hub, and is globally accessible to everyone.
- publishes the port 9990 on localhost, which accepts web requests in your computers browser at “http://localhost:9990”
- publishes the ports 5700 and 9000 via UDP for access via Touch OSC
- finally the
-dtells the docker engine to detach
Touch OSC and the web interface at http://localhost:9990 are how you interface, as a human, with the lights server and influence the shows that are running and their parameters. We’ll dig deeper into TouchOSC in another post.
At this point, with the Docker container running, you should see the painted sheep in the Processing-based simulator changing colors.
Before we get into the software bits, we should cover some basic docker commands…
- To see what containers are currently running issue
docker ps - To see a containers logs issue
docker logs [container id|container name](that’s container id or name) - To stop or kill a container issue
docker kill [container id|container name] - To enter an interactive shell within the container issue
docker exec -i -it [container id|container name] /bin/bash - To view logs for the container issue
docker logs [container id|container name]
Now onto shows…
Show types and server parameters
The sheep consists of panels and sharpies that make the eyes. Shows can influence the panels and the eyes, the eyes only, or the panels only. In addition to those three show types there are also “overlay” shows meaning they only work while a button is pressed and then the server immediately resumes what it was doing previously. This gives us the list:
- panel shows
- eyes only shows
- panel and eye shows
- overlay shows (panels only)
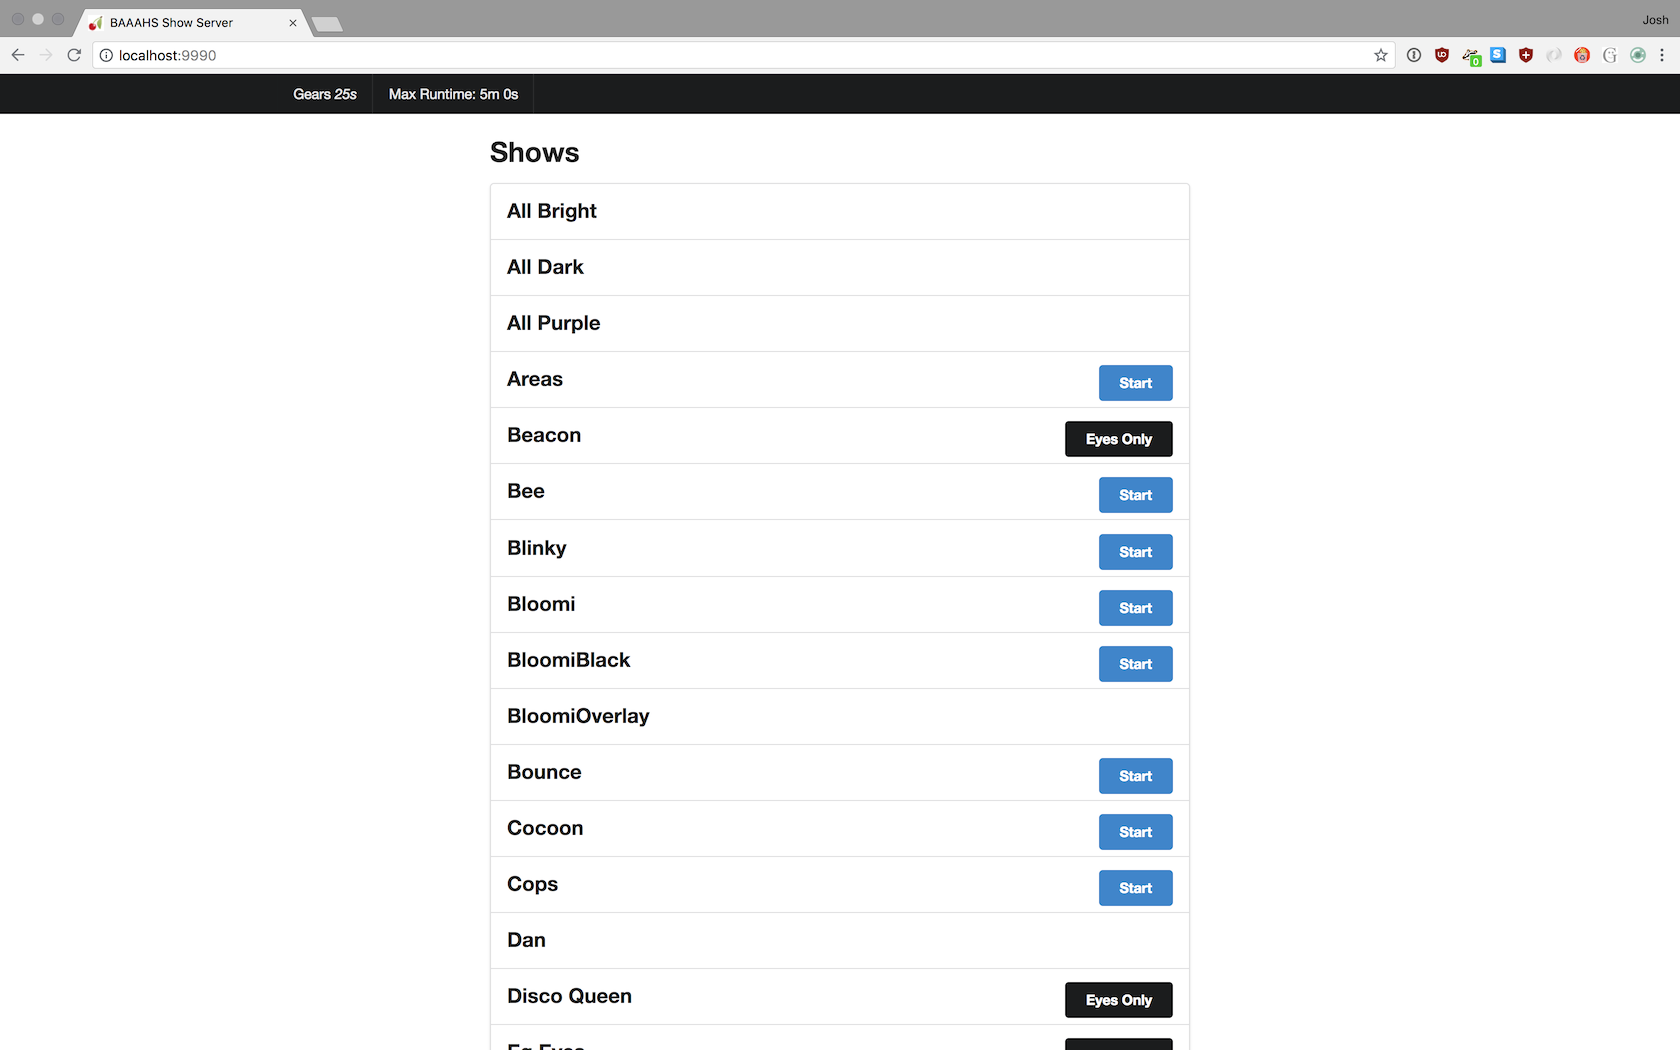
The previous image and web interaction introduced you to the web interface for the server. This interface is good for general development but doesn’t expose all the elements of the model to you as a user. A non exhaustive list of these elements are:
- The primary and secondary colors
- The speed of the show
- The max time for a given show in the server
…and you need TouchOSC installed and configured to make this happen. For now just know the elements exist and I’ll go over the installation and configuration at the end of this document.
Eye specific show types and functions
The eyes be configured, on the fly, to run with a show that supports eye control. The eyes can also be independently run and placed into one of the other two modes:
- Disco Ball mode - takes the party side sharpie (eye) and aims it at a pre-defined location, typcially where the crook and disco balls are placed
- Headlight mode - places the lights in a fixed location in front of the bus to aim spotters and the driver when moving. this mode also gives the user a 2d plane for moving the lights up-down, left-right, etc…
Writing a show
There are two types of shows; “legacy” shows and shows that extend LoopingShow. I will be covering the “legacy” shows in this section and for the record, lifting this directly off the mark down document that Tom Seago created.
Each show is defined in it’s own class, and there are two main methods that need to be defined on each class: next_frame and set_param.
next_frame is the core of the show - this method is called repeatedly to run the animation. Each call to the method generates the next frame of the show, and then pauses for a predefined amount of time before being called again. Shows indicate how long they would like to pause by using the yield keyword - please do not put an actual pause in your show or it will cause problems!
set_param is called to set values from OSC or other external programs. This method will be called between calls to next_frame, so most shows should just remember the values being set and then have next_frame take it into account the next time it is called.
There are two main external objects your show will interact with: the sheep_sides object (passed in to the show constructor), and the sheep module (imported at the top of the example show).
The sheep_sides object has three different attributes representing the two sides of the sheep and a “mirrored” mode. Your show calls any of these objects to set the color of a cell. The main methods are:
- set_cell(cell_id, color) - Sets a single cell to a color
- set_cells([cell_ids], color) - Sets a list of colors to a single color
- set_all_cells(color) - Sets all cells to a single color
- clear() - Turn off all cells
The color objects are created by calling either the RGB() or HSV() function from the ‘color’ module. See the Color section below for more details. An individual panel may be turned off by setting it’s color to black - RGB(0,0,0) or HSV(0,0,0).
(Note: Panels turned off in the simulator will display as a light grey, not black - somewhat approximating how things will look in real life. Plus, this way you can still see them against the background otherwise they vanish against the black background of the simulator)
The sheep module should mainly be used for it’s description of the physical geometry of the sheep. It defines a list of panels in various groupings and functions to determine the which panels touch each other. The existing groupings are:
- ALL - All panels, mainly useful if you want to choose a panel randomly
- LOW - A horizontal ring of panels closest to the ground
- MEDIUM - The panels in between the LOW and HIGH rings
- HIGH - A horizontal ring of panels at the top of the sheep
- VSTRIPES - A list of lists defining vertical stripes
… and some “sheepish” ones:
- SHOULDER
- RACK
- LOIN
- LEG
- TAIL
- BUTT
- FACE
- HEAD
- EARS
- THROAT
- BREAST
For more information on the geometries, see the geom.py file.
And there are two functions that you can call:
- edge_neighbors(panel_id) - Gives the list panel ids that share an edge with a given panel.
- vertex_neighbors(panel_id) - Returns a list of panel ids that share only a vertex with a given panel.
These may be useful depending on what kind of effects you are after, but just use these as suggestions - you are free to create your own groupings in your own show.
Everything is defined in the file sheep.py, so consult that file if you have further questions!
Writing a show: color
Color can be specified in either RGB or HSV, whichever you prefer, and are transparently converted as needed between the two. RGB is probably most familiar color scheme used in computer graphics, but some tasks are simplifed by using HSV, such as fading to white or black or randomly selecting a “bright” color. If you’re not familiar with HSV, Wikipedia has an explanation and some helpful charts.
The functions ‘RGB’ and ‘HSV’ from the color module should be all you need to create the colors needed for your masterpiece.
RGB colors are represented as three integer values ranging from 0-255, representing Red, Green and Blue respectively. HSV are represented as three floating point values ranging from 0.0 to 1.0 and represent Hue, Saturation and Value (or brightness).
(Some systems using HSV specify Hue as an integer between 0 and 360, so if you’re accustomed to that you should just divide your hue by 360, keeping in mind Python’s sometimes surprising division rules)
In RGB, black is specified as (0,0,0) and white is (255,255,255)
In HSV, black is specified as (?,?,0) and white is (?,0,1)
Regardless of whether you specify a color using RGB or HSV the color object will have both ‘r’, ‘g’, ‘b’ and ‘h’, ‘s’, ‘v’ attributes that can be read or adjusted to change the color.
For example, to create a pure Red and fade it to black over 10 steps you can specify the color using RGB but fade to black using the ‘v’ attribute:
color = RGB(255,0,0)
while color.v > 0:
	print color.rgb
	color.v -= 0.1
By adjusting the ‘s’ attribute in the same way, you could desaturate the color until it became white.
Be careful of making changes to a color object that’s used elsewhere in your sketch - there may be unexpected results unless you call copy() on the color and modify the copy.
Writing a show: basic Animations
You can call as many set_cell(s) methods as you want during each frame of the animation - they are buffered up and sent only once at the end of the frame.
Each next_frame() function can yield from multiple places if you want to have different parts of an animation that run at different speeds. For example, this fades a pixel over one second, waits two seconds and then starts again:
while True:
	color = RGB(255,0,0)
	while color.v > 0:
		cells.set_cell(target, color)
		color.v -= 0.1
		yield 0.1

	yield 2.0
Run a sample show in the docker container
Let’s step through the following show and run it within our container.
Here’s the show:
from __future__ import division

import sheep
from color import RGB

A = [1, 3, 4, 7, 9, 12, 16, 18, 19, 21, 22, 24, 27, 30, 33, 35, 37, 39, 42]
B = [2, 5, 6, 8, 11, 13, 14, 15, 17, 20, 23, 25, 26, 28, 29, 31, 32, 34, 36, 40, 41, 43]

class WhackAttack(object):

    def __init__(self, sheep_sides):
        self.name = "WhackAttack"
        self.cells = sheep_sides.both

        self.hertz = 30
        self.speed = 1 / self.hertz
        print "Running at %d Hertz (%f delay)" % (self.hertz, self.speed)

        self.color1 = RGB(255,148,0) # orange
        self.color2 = RGB(148,0,255) # purple

    def next_frame(self):
        while True:
            self.cells.set_cells(A, self.color1)
            self.cells.set_cells(B, self.color2)
            yield self.speed
            self.cells.set_cells(B, self.color1)
            self.cells.set_cells(A, self.color2)
            yield self.speed
This show will take the panels listed in the collections A and B and alternate between them very quickly between the colors “orange” and “purple”. To run this show in the docker container and make it viewable within Processing we first need to terminate the existing, running container (Processing only accepts input from one server at a time).
To do this, list the running containers via docker ps, then kill the container via docker kill [container id|container name] (that’s the container ID –OR– the container name).
Now, copy the contents of WhackAttack and save it to a file on your computer, say, on your Desktop. Next, in a terminal, alter and run the following command:
docker run -v /Users/jdurbin/Desktop/WhackAttack.py:/lights/shows/devshow.py --publish 9990:9990 --publish 5700:5700/udp --publish 9000:9000/udp baaahs/light-server:latest
You’re altering the path /Users/jdurbin/Desktop/WhackAttack.py such that it resolves to the file you saved with the contents of the aforementioned WhackAttack show.
Once you’ve successfully done this, you should see your Sheep in the Processing simulator changing again. You should also be able to hit http://localhost:9990 and see the show WhackAttack listed. Select the blue “Start” button to run the show.
Note: the server does compile the show when it starts, so whenever you make a change to your show, you have to kill and restart the server (again, make sure you’re using the -v volume flag and mounting your local file to /lights/shows/devshow.py)
Existing shows
I highly recommend stepping through the existing shows, taking a show you like, making a copy of it, and altering it until you’re happy with it.
The shows are listed here.
TouchOSC Installion
As discussed earlier in this guide, TouchOSC exposes more elements of the model, more aspects of the system for a user to tweak in real time. In addition to this, TouchOSC also uses a broadcast style of communication meaning that all users of the system see the same control “settings” at the same time. For ex: if two people are on their mobile devices, connected to the server, they both see the show playing, one can update and in realtime the other sees that show as playing. One person can turn a knob or hit button and the other users will see the same thing. This is because there’s only one model; one state tracked by the server.
To get started with TouchOSC understand that there are two parts:
- The BAAAHS specific layout (user interface)
- The integration and communication with the server
Think of the specific layout as a webpage and TouchOSC as a browser; the interface has knobs defined, buttons, sliders, selectors, and they are configured and mapped to inputs on the server.
Normally you have to be on the baaahs network to get the layout, or use the TouchOSC editor software. However, I’ve packaged the layout server in a docker container just as the light server, so its trivial to get the layout.
To run the layout server, execute:
docker run -d -p 9658:9658 baaahs/layout-server:latest
Then follow the instructions here. Then, while on the same network as your machine/laptop, point the TouchOSC layout endpoint to your machine’s IP address. This will instruct the TouchOSC client to hit the layout server running in docker and pull down the layout. Once you have the layout you never need to re-execute these tasks.