BAAAHS Lights: An overview
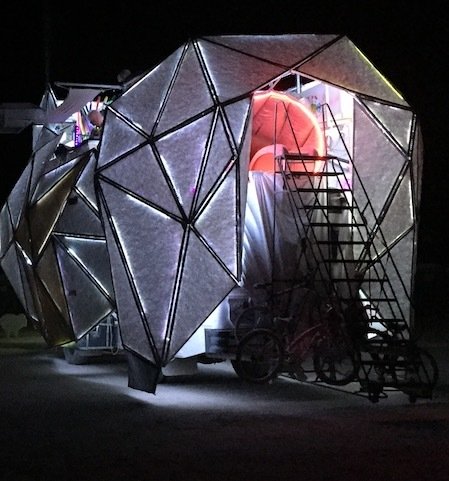
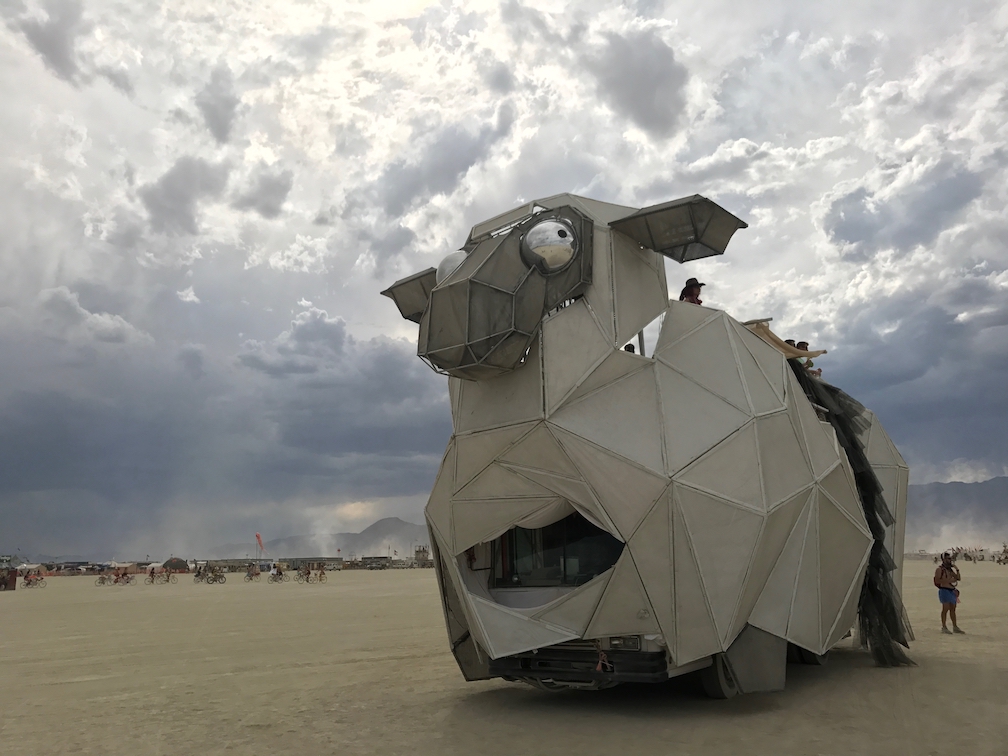
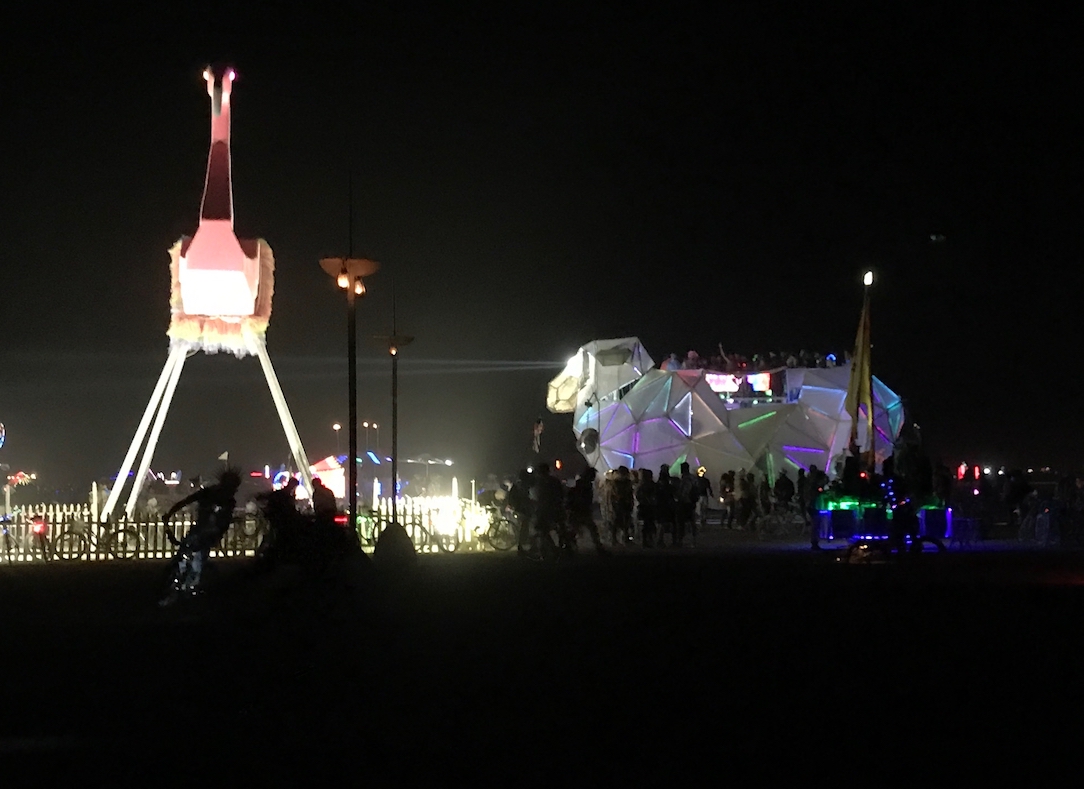
BAAAHS, the Big Ass Amazing Awesome Homosexual Sheep, is known for its beats, its jaw dropping appearance, and its grand entrance.
This will cover its bedazzling light shows and how they happen!
Intro
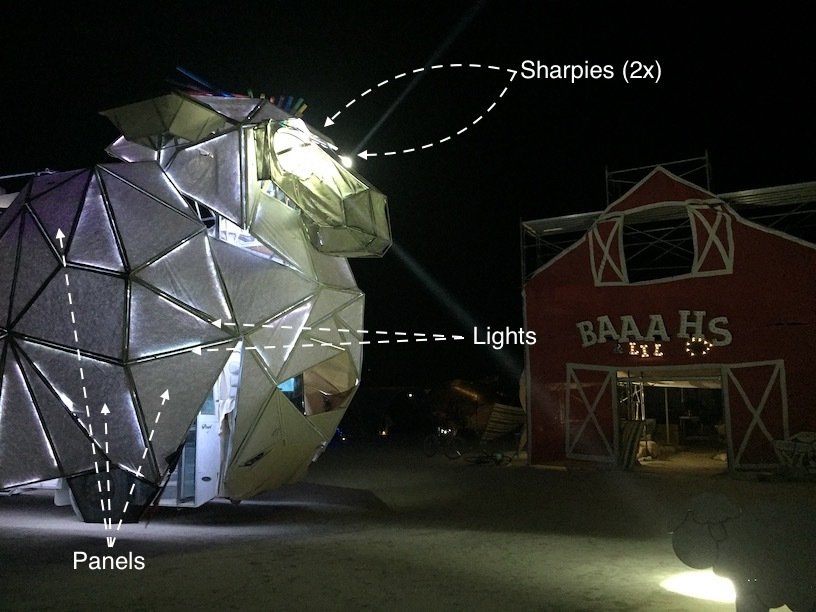
BAAAHS nighttime illumination is made possible by roughly 140 skin panels, outlined with LEDs in tubes and sharpies that function as its eyes.
BAAAHS’ server aims to give producers/DJs some amount of live influence over pre-programmed shows while they execute. The server talks to the panels and sharpies via a standard light control protocol termed DMX.
Physical Bits
The physical elements of the system include panels with light tubes and sharpies that function as its eyes.
Panel Layout
Panels are spread across various regions of the bus:
- party side (side with DJ and speakers), also known as the “D” side for driver
- business side, also known as the “P” side for passenger
- head, butt, and feet
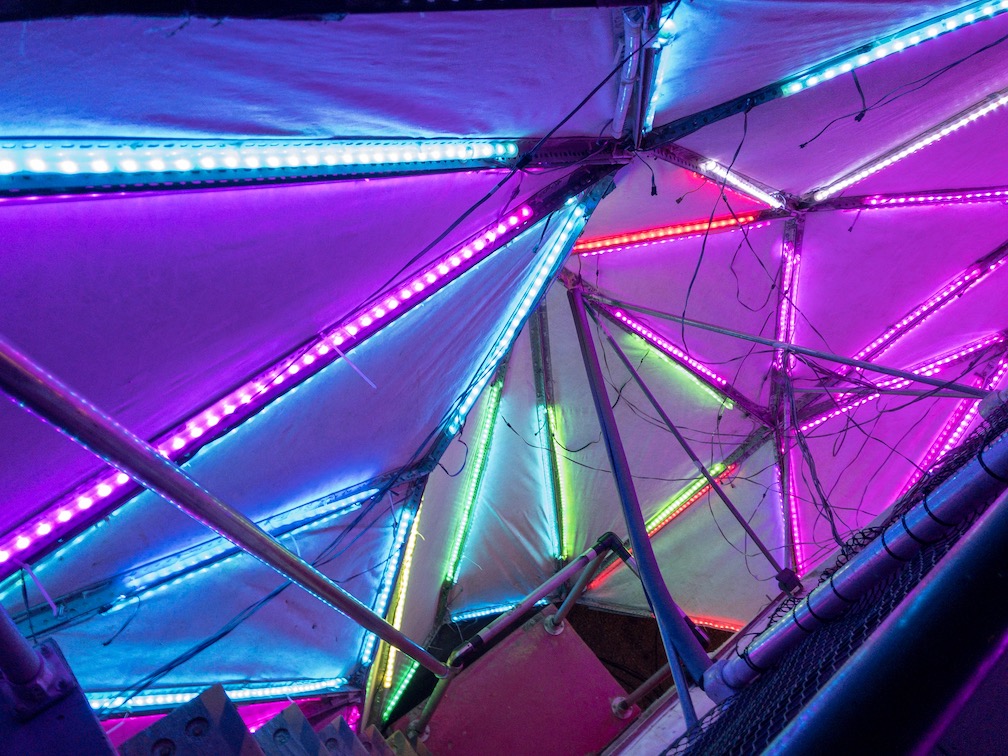
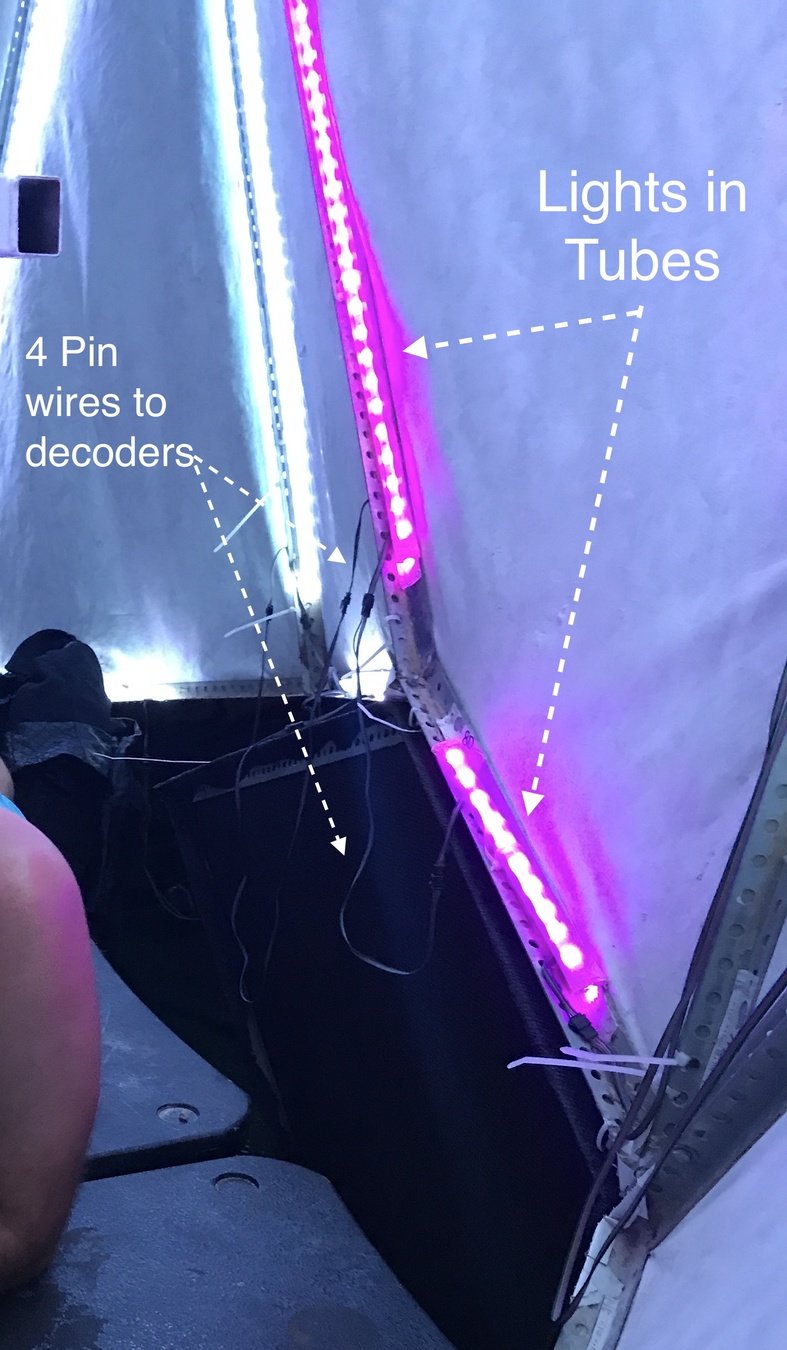
LED Strips
Panels typically consist of 3 or so (up to 5, as few as 2) light strands bundled inside tubes connected in a series.
Each tube has a male and female connector end and some panels use extensions in-between panels.
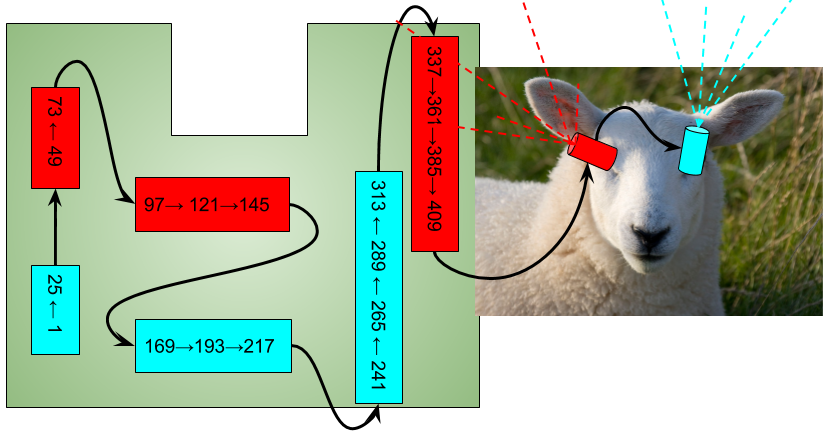
Eyes (Sharpies)
The sharpies are installed on sliding rails and retracted during the day when reflective hemispherical eyes are installed. At night the sharpies are deployed and aimed, most commonly at…
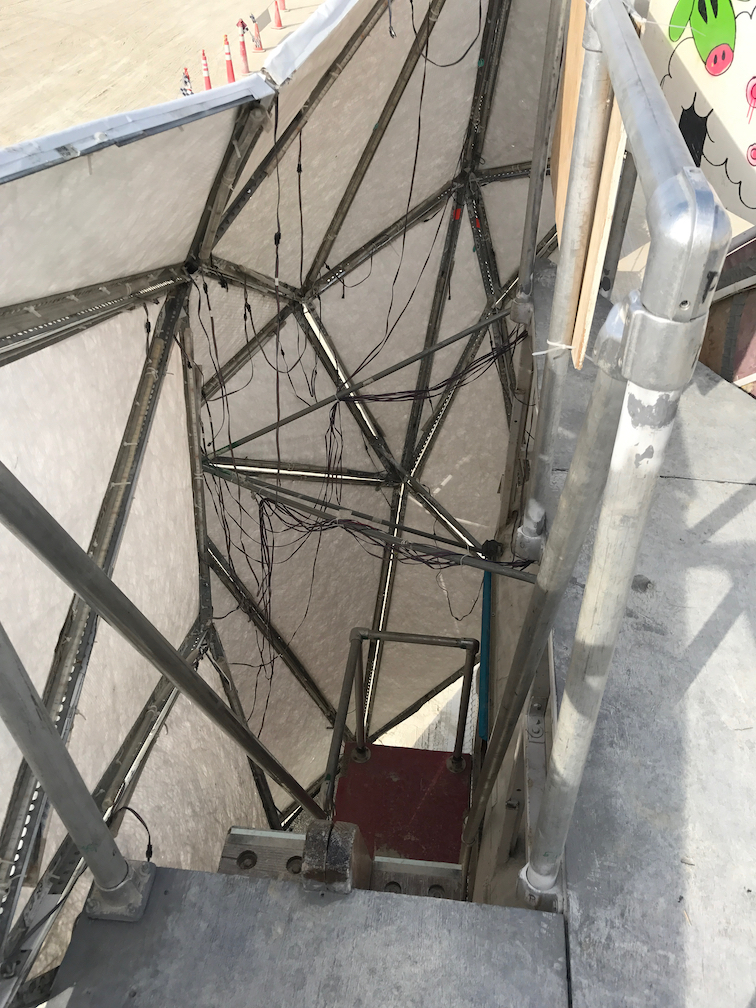
A somewhat flatted view of inside the head, from the top deck, without the sharpies installed looks like:

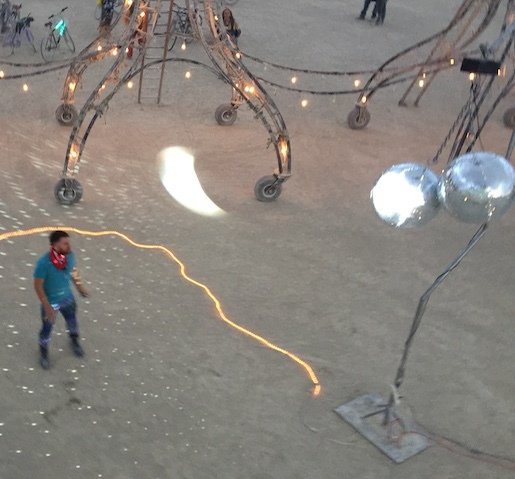
Disco Balls
When the BAAAHS is stationary for any lengthy amount of time, its disco balls are temporarily installed out near the dance area on the party side of the sheep and anchored into the ground. The party-side sharpie is then configured to point and bounce light off the disco ball.
Electrical
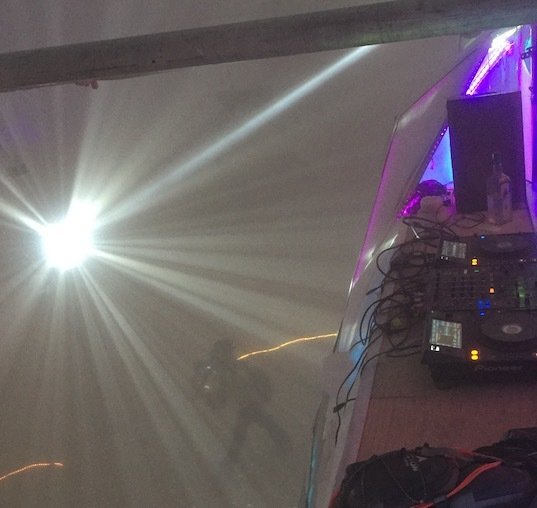
Jeffries Tubes
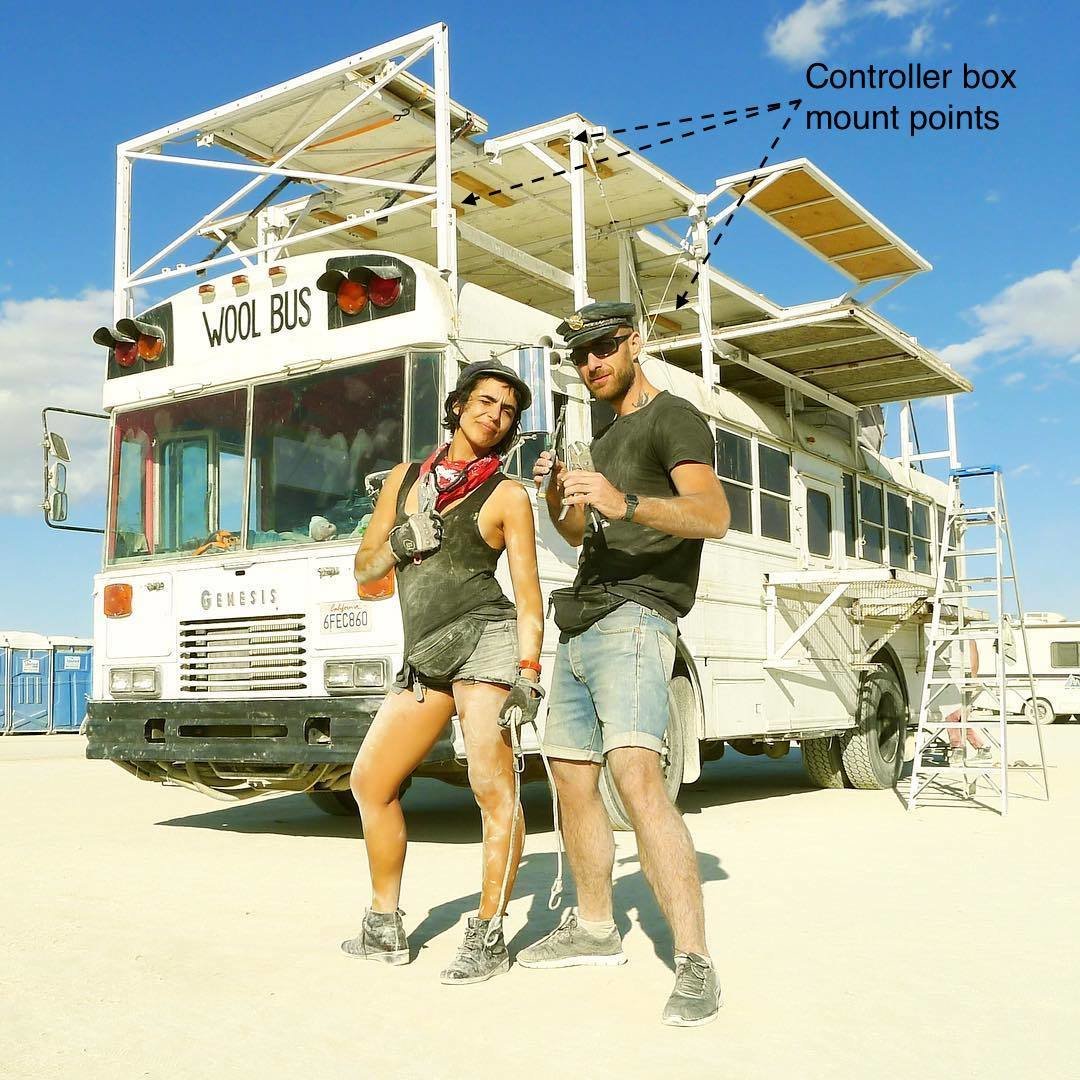
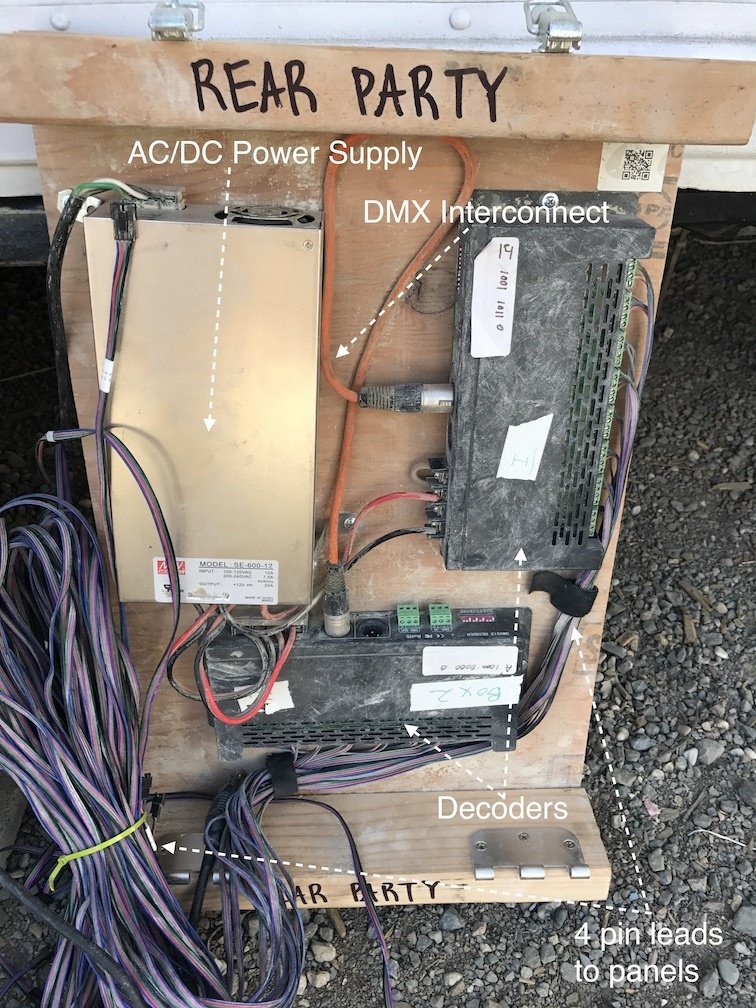
The area between the roof the bus and the floor of the upper platform is known as the Jefferies Tubes. Here, six controller boxes are mounted on roof (the floor of the upper platform), affixed with door pins and hinges.
Controller Boxes
The controller boxes are labeled and are additionally identifiable based on their width.
The two front boxes are 24” wide. The middle party is 18” and the middle business is 20” wide. The rear boxes are 15” wide.
Controller Box Anatomy
Each box contains a minimum of the following:
- AC/DC power supply
- 2x DMX-512 24-Channel Decoders
- 4 pin cables, with male JST SM connectors
- DMX Interconnect cables
What is DMX?
DMX-512 is a standard for digital communication networks that are commonly used to control stage lighting and effects.
They are serially connected systems consisting of:
- a controller which transmits a stream of data
- slave devices, in our case, DMX Decoders and Sharpies, that receive a signal, act on it, and send it along unchanged
- a terminator (optional, based on distance)
DMX Signal
The Controllers transmit data (frames) at a rate of about 40x per second. Each frame consists of…
- a Universe, which consists of…
- 512 Channels, each with a numerical value ranging from 0-255
Cables and connections
Though the official standard for DMX is 5-pin, most modern day lighting systems use 3-pin XLR cables and interfaces.
DMX-512 female connectors are outputs while the male connectors are inputs. (ex: the server’s controller interface is female)
Slaves
BAAAHS consists of the following DMX Slaves:
- eighteen 24-Channel DMX decoder boxes
- two 16-Channel sharpies
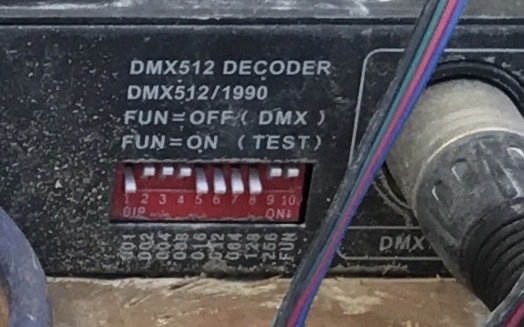
Addressing
Pre-configured offsets are defined per slave and dictate what portion of the 512 Channels the slave interprets.
The image to the left is configured to 241, meaning it interprets channels 241 through 264.
Channel Usage
- The sharpies use 16 channels to control functions like: pan, tilt, focus, color, etc…
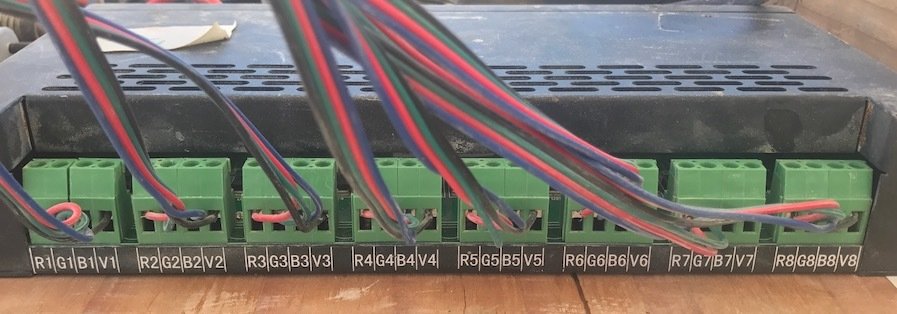
- The DMX decoders map their 24 channels across the 8 connected panel leads starting with the Red, Green, then Blue LED for each channel – RGBx8
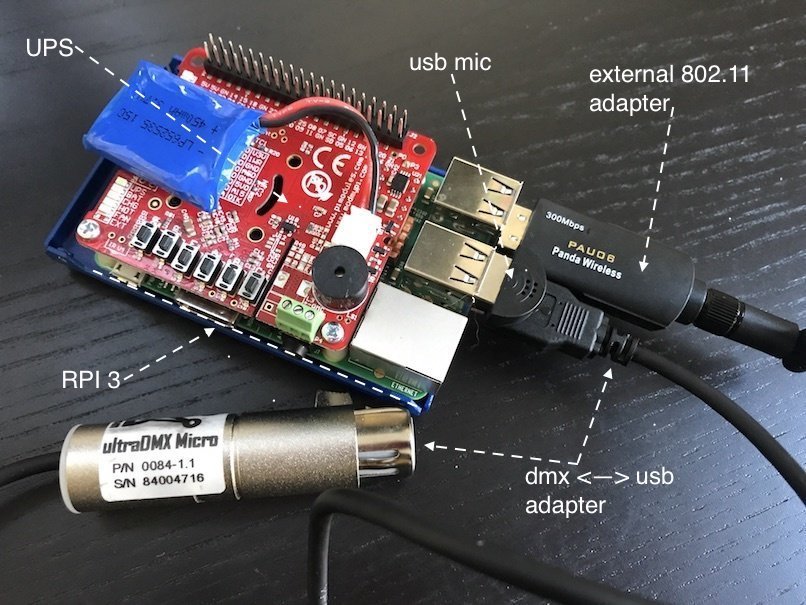
Control Server
The server is the controller of BAAAHS’ lights and its sharpies. It runs extra special code, maps colorful shows to panels, and talks to those panels thanks to DMX.
The server additionally establishes a WIFI access point so that mobile devices and computers can connect to it for admin and non-admin functions.
Components
- Raspberry PI 3
- USB to DMX interface, the “controller”
- USB 802.11 WiFi Adapter
- USB microphone
- RPI3 UPS HAT
Server Functions
- 802.11 Access Point
- SSH daemon
- OpenLighting daemon
- Python show or “lights” daemon
- Touch OSC Layout Server
- Python sound analysis / beat detection
- USB DMX Controller
Lights and DMX Control
The “lights” server runs shows, which in turn make API calls to the OLA daemon, which has a pre-configured DMX universe. The universe is configured to output DMX frames over the server’s USB controller.
[shows] -> [OLA] -> USB/DMX -> DMX -> DMX...
The shows and show servers are written in Python.
Shows
There are a variety of show types:
- Panel show (“master”, most of what we’re talking about)
- Eyes only show
- Overlay shows
Some shows have configurable parameters:
- primary and secondary colors
- brightness, tempo, and intensity
Panel Mapping
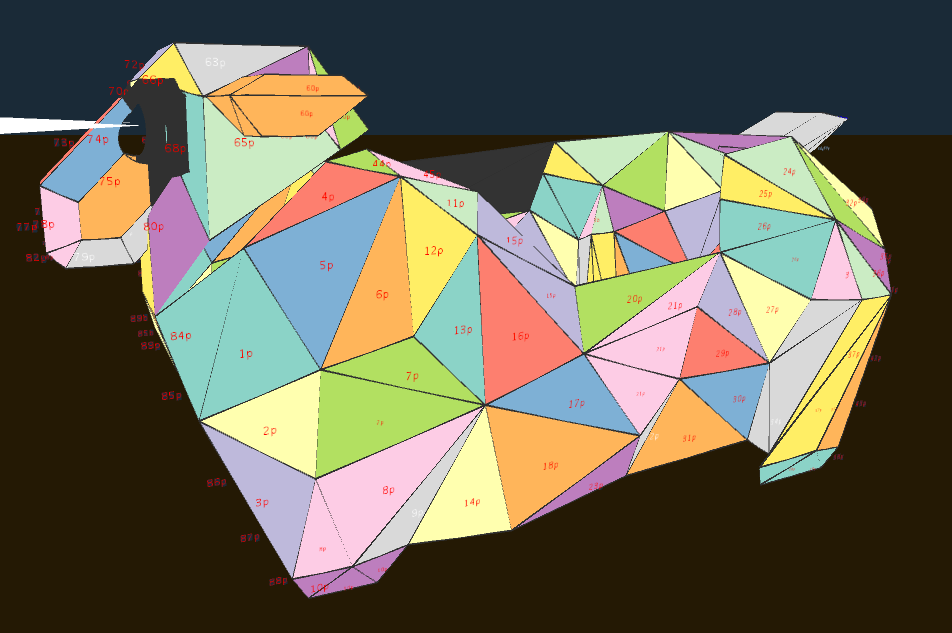
The lights service contains a model of the sheep that refers to each specific skin panel. This provides show developers a reliable “API” from which to change aspects of sheep such as the color of specific regions, waves of color, etc…
Each time BAAAHS panels are deployed the mapping changes. This concept not only benefits show developers, but builders too! It frees them from the burden of consistently ensuring specific panels are connected to specific DMX decoders.
It does mean, however, that an essential step in any deployment is running and replacing the panel mapping file.
Resiliency
There are a few levels of resiliency with BAAAHS’ server infrastructure.
- All essentially daemons (lights, OLA, OSC layout) are monitored for failure and automagically restart
- An internal UPS ensure safe shutdown and temporary power when line power fails
- Multiple network interfaces allow for wired and wireless access to the server in the case of an adverse event
Web Interfaces
To interface with the server you’ll need a mobile device or computer and will need to be in range of the sheep. If you are, you’ll see an 802.11 AP “baaahs”. The password for this network is “baaahs2017”.
There are 3 web interfaces to be aware of…
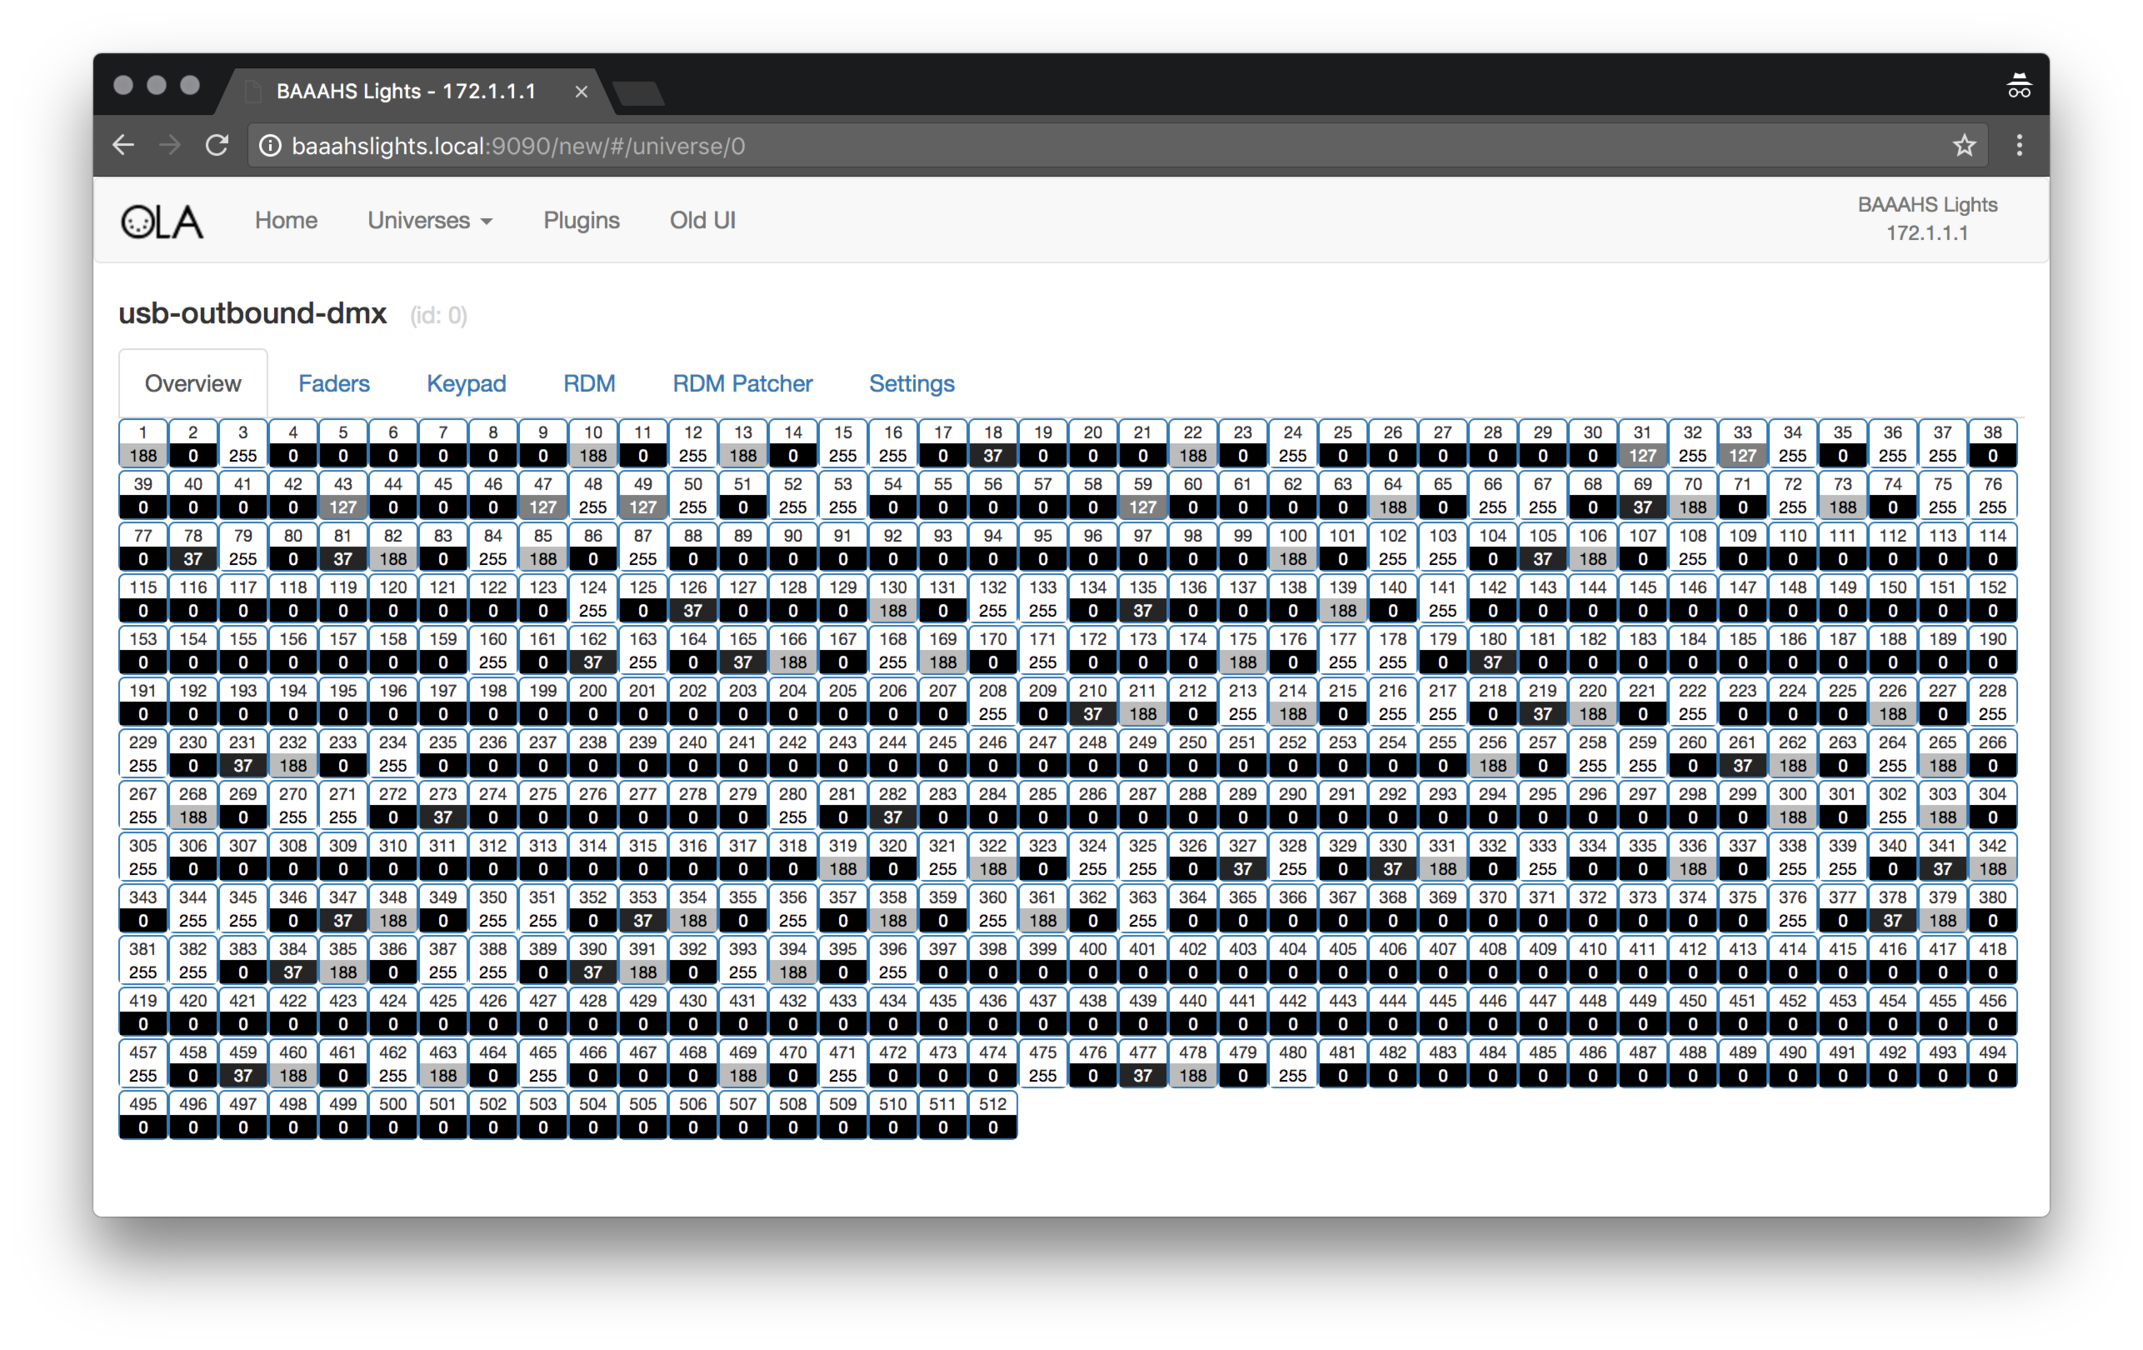
Web Interfaces: OLA
The OpenLighting alliance web interface allows for the configuration of:
- universes and input/outputs
- explicit channel value overrides – i.e. all channels dark (0), all channels white (255)
- channel states
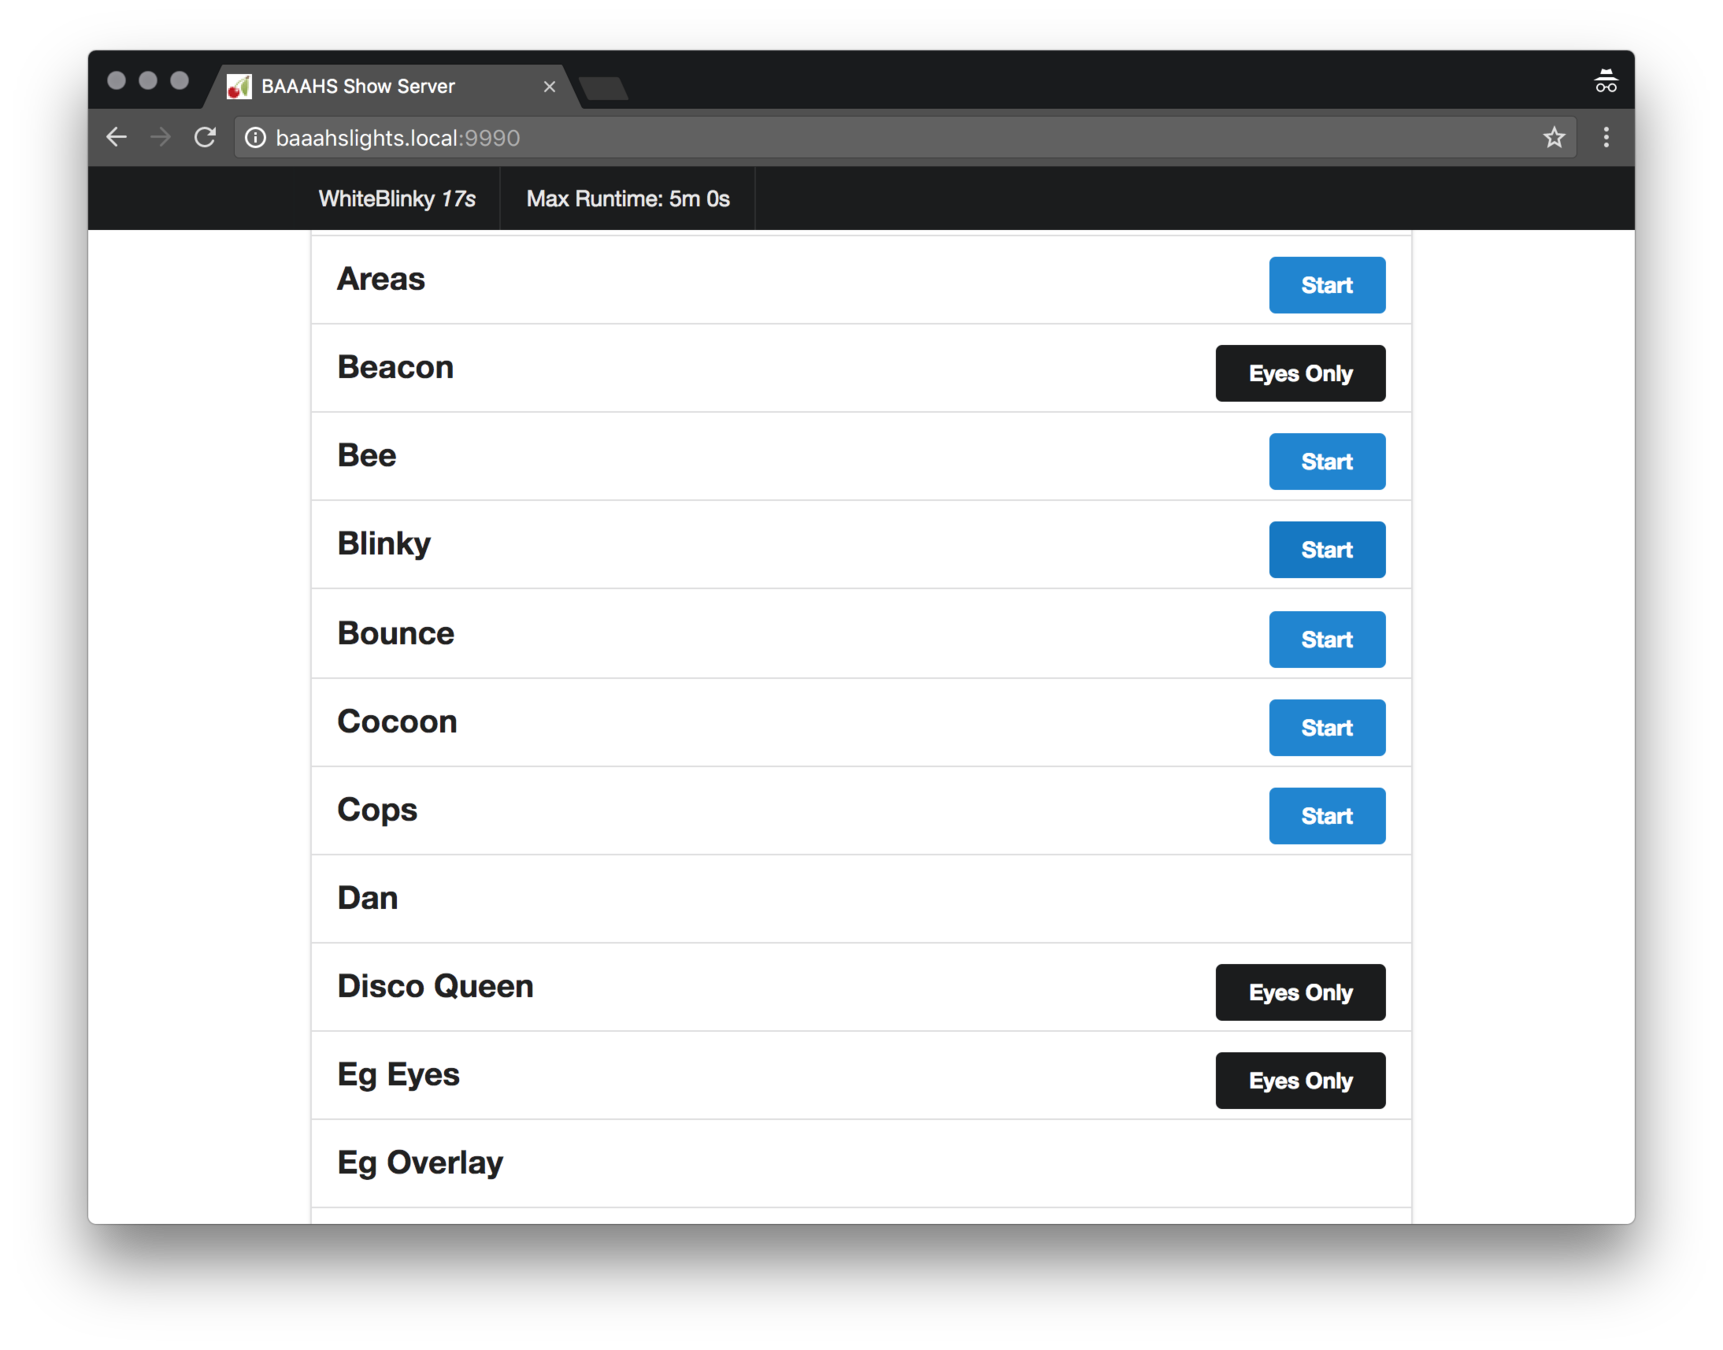
Web Interfaces: lights
The lights web interface provides a mobile-first alternative to TouchOSC for show selection.
The lights server additionally provides the backend APIs for the TouchOSC clients.
Web Interfaces: OSC Layout
There’s no screenshot for the Touch OSC Layout service. This services sole function is to serve a layout file which can be loaded into a mobile application for iOS and Android named TouchOSC. After installation, you point Touch OSC at the server and it will hand you back our custom layout and interface patterns.
SSH Access
Generally users will not have to SSH into the server. The only time it is normally necessary is for the panel mapping step.
There are two accounts on the server; baaahs and pi. The pi account comes stock with the OS and is used for automated delivery and setup of the server. All configuration and administrative tasks should be done from the baaahs account.
Deployment Steps
- Install struts, panels, bolt in place for head, party side, business side, etc…
- Install (6) controller boxes
- Establish connectivity between each panel and an available lead from controller boxes
- Connect to server via SSH and run the panel mapping script
- Interact with server via TouchOSC
DMX Decoder Testing
DMX Decoders can be placed into manual mode, where they run through their own, pre-programmed functions. While in these modes, DMX Decoders will continue broadcasting DMX messages down the chain but the decoder won’t interpret or act on these messages.
Common Issues
Set sheep to full white
BAAAHS needs DMV certified and the panel mapping is incomplete.
Turn off the “lights” service and instruct the OLA daemon to set all Channels in the universe to 255 – is a one button click.
Lights are on but “stuck”
Open the web interface for the lights service and see if there’s an active show running. If the service isn’t running it likely crashed and will be restarted in a few seconds.
Note: When the server restarts it selects a light show at random.
Lights are off, server is offline and unable to start
Refer to the test and demo functions in the DMX section of this doc. They include the dip switch positions to active the test and demo modes of the controller. When these are active the DMX decoder does not evaluate DMX signals from the server. Additionally, if fallback to these modes is required, each DMX decoder requires the dip switch positions/configurations.
Connected to baaahs wifi but DNS fails
This sometimes happens because Avahi, an offline DNS daemon, is amuck. A simple restart of the server will fix the issue or you can interact with the server via it’s IP at 172.2.1.1.
How to restart a server with no buttons
The server has a battery and power regulation mechanisms inside, but is set to self shutdown after 60 seconds without line power. To shut the server down, unplug the micro USB connection from the server and wait 90 seconds before re-connecting power. You will hear two tones; one when power is disconnected and one 60 seconds later when the shutdown signal is issued.
OLA and Lights services are running, but panels are stuck
Check to make sure the default DMX universe, “usb-outbound-dmx” with the ID 0 has the output device set to “DMXking.com - ultraDMX Micro…". See the standard operating procedures for more information.
TouchOSC
TouchOSC is an iOS and Android OSC client that interfaces with the BAAAHS Lights service to control shows, control the sharpies, speed or slow shows, change colors, etc…
Install Instructions
In order to use OSC with the server, you should first have the TouchOSC app installed on your iOS or Android device. Once installed, connect your mobile device to the “baaahs” wireless network with the password “baaahs2017”.
Once on the network, you should be able to interact with the server via its DNS name “baaahslights.local”. However, if you find this isn’t working, you can alternatively use the IP address of the server “172.16.2.1”.
Now, with that out of the way let’s setup TouchOSC…
- Open TouchOSC
- Select the first OSC connection type listed under connections. It should be an IP address, but is unlikely the proper address.
- The endpoint configuration screen lists of a variety of configuration parameters. The only one we’re concerned with is the IP address. This screen should locate the server and list it under “Found hosts” as “Sheep@baaahslights”. If you tap this, it will set the configuration values for you and you’re done. If, however, it’s for some reason not populating, you can enter the host manually using the servers hostname “baaahslights.local”. When you’re done, select the “TouchOSC” navigation link to go back to the previous screen.
- Select the Layout is currently set for your client. Note: If you’ve just installed TouchOSC you’ll have many layouts (unlike what’s depicted in the screenshots in this doc), but unfortunately you don’t have the BAAAHS specific layout.
- Select the “Add” option to add a layout.
- Under “Add Layout” you’ll likely have no available layout hosts. Here we need to add our server such that our mobile client can retrieve the custom layout. Select the “Edit” button in the upper right hand corner of the app. Then, select the “+” in the upper left hand corner of the app and enter the hostname “baaahslights.local”, and select “Done” (on the keyboard).
- Select our newly created layout server endpoint to download the layout, “BAAAHS Main”.
- With our “BAAAHS Main” layout selected, select the “TouchOSC” navigation element in the top left hand corner of the app to proceed back to the TouchOSC launch screen.
- Select “Done” in the upper right hand corner of the app to finish the setup process. Optional Step 10; I recommend killing the TouchOSC app at this point and re-launching the app to avoid any issues with the layouts and server communication. (You’ll never have to do this again).